You can also check out my Youtube Channel to get access to various tutorials created by me.
Gradle is used very often in the industry and I felt it will be good to cover the basics of Gradle in this article so that it can be used efficiently😄
What is Gradle
Gradle is a Build Automation tool and is also Open source. This Article will cover the following topics in Gradle.
- Creating a Java Application by using Gradle as the build tool
- Running Unit tests for the Java Application
- Gradle Build Script and Tasks
Installing Gradle
You can Install Gradle from https://docs.gradle.org/current/userguide/installation.html
Also ensure Gradle is set in the PATH so that gradle commands work.
you can verify if gradle is installed and can be accessed using the command
gradle -v
Also ensure JAVA_HOME is set.
Creating a Java Application by Using Gradle as Build Tool
Create a folder called as ‘simple-gradle-java-app’ and enter into the folder in command prompt. This will be our project folder.
mkdir simple-gradle-java-app
cd simple-gradle-java-app
Use the following Command to Initialize Gradle for this project
gradle init
This will ask you to select the type of project to generate. Choose ‘application’. This is because we are creating an application
Next you will be asked to select Implementation Language. Choose ‘Java’. This is because we are creating a Java Application.
Next you will be asked to Choose Build Script DSL. Choose ‘Groovy’. In this Demo we will be using Groovy as the build script language.
Next you will be asked to Select a Test Framework. Choose ‘Junit Jupiter’.
For now you can leave the project name and source package as default.

Folder Structure
Once the project is created. It would have the following Folder Structure
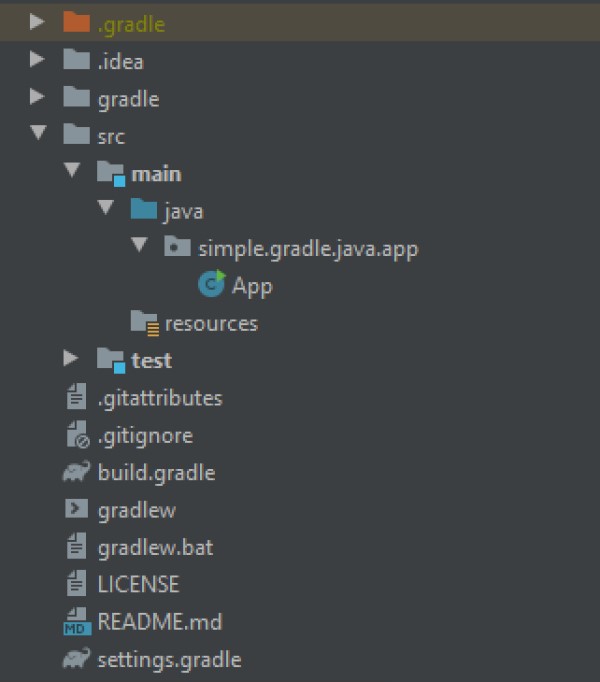
Some of the notable items created in this folder structure are
- src/main/java: This is the folder which has all the Java Code in the Application
- src/test/java: This is folder which has all the test cases for the Above Java code
- gradlew and gradlew.bat: This is the gradle wrapper which is used the run various gradle tasks and Commands. gradlew works in Linux and MacOS and gradlew.bat is used for Windows.
- settings.gradle: This file indicates which projects to include in the build. In our case we have only one project which is ‘simple-gradle-java-app’. This is set in settings.gradle as
rootProject.name = 'simple-gradle-java-app' - build.gradle: This is the file in which the Build Script is written. We will be discussing more on this later in this Blog.
- gradle: This is the folder which has all the Gradle Wrapper files
Modifying the Java Class and Its Test Class
In src/main/java The Init Script has automatically Created a Java Class called as App.java.
This is the Java class which is Automatically generated for us.
package simple.gradle.java.app;

public class App {
    public String getGreeting() {
        return "Hello world.";
    }

    public static void main(String[] args) {
        System.out.println(new App().getGreeting());
    }
}
Replace the Above Java class with the following Class
package simple.gradle.java.app;

public class App {
    public static int getSum(int num1, int num2) {
        return (num1 + num2);

    }

    public static void main(String[] args) {
            System.out.println("Sum is " + getSum(4,5));
    }
}
We have a function here called as getSum which returns sum of 2 numbers. The main function calls this function.
In src/test/java the Init Script has automatically created a Java Test class for us Called as AppTest.java
The class this is generated is given below
package simple.gradle.java.app;

import org.junit.jupiter.api.Test;
import static org.junit.jupiter.api.Assertions.*;

class AppTest {
    @Test void appHasAGreeting() {
        App classUnderTest = new App();
        assertNotNull(classUnderTest.getGreeting(), "app should have a greeting");
    }
}
Replace the Above java class with the following
package simple.gradle.java.app;

import org.junit.jupiter.api.Test;
import static org.junit.jupiter.api.Assertions.*;

class AppTest {
    @Test void getSum() {
       int result = App.getSum(10, 12);
       int expected = 22;
       assertEquals(expected,result);
    }

    @Test void main(){
        App.main(new String[]{});
    }
}
Here we have written a unit test to check if getSum function is working as expected.
Running The Java Application
First let us build the project using Gradle. This can be done using the following command
Windows
gradlew.bat build
Linux and MacOS
./gradlew build
Once the build is done, a folder called as build is created which will have the built project and also it would contain information like the test reports.
Then we can run the Application using the following Command
Windows
gradlew.bat run
Linux and MacOS
./gradlew run
This will Run the application and Print the output as Shown Below
> Task: run
Sum is 9
If needed we can clean the build using the below Command
Windows
gradlew.bat clean
Linux and MacOS
./gradlew clean
This will delete the build folder.
Running The Unit Tests
When we Built the project using the build command, it would automatically run the Test classes as well and Generate the Test reports
The Test reports can be found in build/reports/tests/test/index.html. Open the index.html file using a browser to see the test results.
Now if you want to run only the tests, then you can use the following command.
Windows
gradlew.bat test
Linux and MacOS
./gradlew test
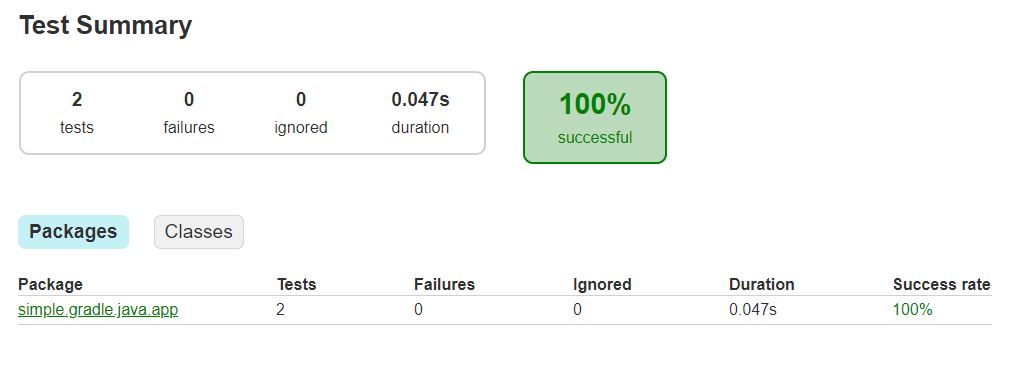
This will also generate the index.html file. The Test report will look as shown below
Now Let us make an Error on Purpose In the code
Replace App.java with the following
package simple.gradle.java.app;

public class App {
    public static int getSum(int num1, int num2) {
        return num1;

    }

    public static void main(String[] args) {
            System.out.println("Sum is " + getSum(4,5));
    }
}
As you can see here, we are always returning num1 instead of num1 + num2 in getSum function which is wrong.
Let’s Run the tests now
Windows
gradlew.bat test
Linux and MacOS
./gradlew test
You would notice that now it says that the Task: Test failed. Let’s check the report in index.html now to see what it is showing
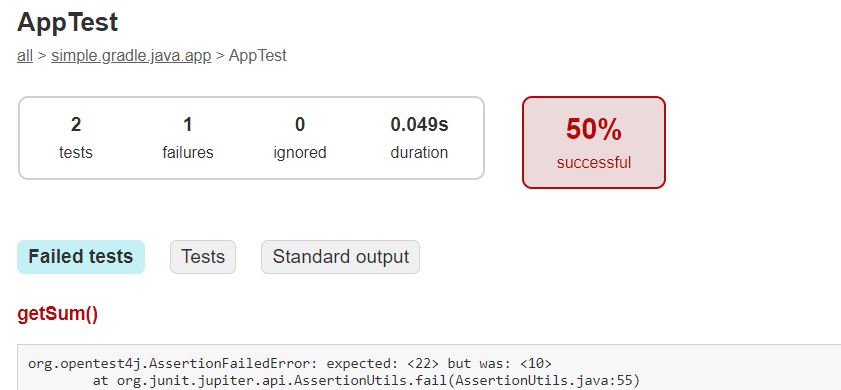
The Error Clearly shows that it Expected the sum to be 22, But then our App logic is returning 10. Hence the Test has Failed.
Now modify getSum Function in App.java to return ( num1 + num2 ) and re-run the test and it will pass
Gradle Build Script and Tasks
build.gradle has the build script. In this demo we are using Groovy for the build script.
The build.gradle which was generated has the following snippets. All of these are already Automatically generated for us. So here I will be explaining all the snippets generated
Plugins
plugins {
    // Apply the java plugin to add support for Java
    id 'java'

    // Apply the application plugin to add support for building a CLI application.
    id 'application'
}
Plugins help to add additional functionality to Groovy. Here we have a java plugin to Support Java Classes. We also have an Application Plugin so that We can build Applications using Groovy
Dependencies
dependencies {
    // This dependency is used by the application.
    implementation 'com.google.guava:guava:28.1-jre'

    // Use JUnit Jupiter API for testing.
    testImplementation 'org.junit.jupiter:junit-jupiter-api:5.5.2'

    // Use JUnit Jupiter Engine for testing.
    testRuntimeOnly 'org.junit.jupiter:junit-jupiter-engine:5.5.2'
}
Dependencies is where we add additional libraries need in the project. For Example here we are mentioning that we need junit jupiter dependency for Unit Testing. If you wanted to make a Database connection, then you will need to use a Library like JDBC for it. In that case JDBC will be added as a dependency.
Repositories
repositories {
    // Use jcenter for resolving dependencies.
    // You can declare any Maven/Ivy/file repository here.
    jcenter()
}
Repositories is the location from where Groovy will fetch and download the dependencies. Here we have mentioned that the repository we are using is Jcenter. You can read more about Jcenter here. Another Commonly used Repository is Maven Central. You can read more about Maven Central here
Application
application {
    // Define the main class for the application.
    mainClassName = 'simple.gradle.java.app.App'
}
Since we have created a Java application, we need to mention the Java class containing the main class in the build script. In this case it is App.Java.
Tasks
A Task is a piece of work that the build needs to do. In build.gradle currently we do not see any tasks defined. But a lot of default tasks already exist. You can see them by typing the following command
Windows
gradlew.bat tasks
Linux and MacOS
./gradlew tasks
This will give the following output
Application tasks
-----------------
run - Runs this project as a JVM application

Build tasks
-----------
assemble - Assembles the outputs of this project.
build - Assembles and tests this project.
clean - Deletes the build directory.
jar - Assembles a jar archive containing the main classes.
testClasses - Assembles test classes.

Documentation tasks
-------------------
javadoc - Generates Javadoc API documentation for the main source code.

Help tasks
----------
tasks - Displays the tasks runnable from root project 'simple-gradle-java-app'.

Verification tasks
------------------
test - Runs the unit tests.
We have already used some of these tasks like build, clean, run and test.
The Flexibility of groovy is that we can add Custom Tasks as well. Let’s add a Custom Task and then Run the Task. Add the following code snippet in build.gradle
task projectupper {
    group = 'Custom Tasks'
    description = 'Task to get Project Name and Convert it to upper case'
    doLast {
        String projectName = project.name
        println "Project Name: $projectName"
        println "Upper case: ${projectName.toUpperCase()}"
    }
}
We have written a simple task here which takes the project name , Coverts the name to upper case and then prints the Name in Upper case.
projectupper is name of the Task
group and description are very important since it will list this task in the tasks report whenever we run gradlew.bat tasks
doLast is where we define the task action. We first get the project Name using project.name, then we convert it to upper case and print it.
In order to run the task use the following command
Windows
gradlew.bat projectupper
Linux and MacOS
./gradlew projectupper
This will generate the following output
> Task :projectupper
Project Name: simple-gradle-java-app
Upper case: SIMPLE-GRADLE-JAVA-APP
This task is a very simple task. We can create much more complex tasks in groovy as well and I will cover those in future articles.
Code
The entire code discussed here is available in this repo https://github.com/aditya-sridhar/simple-gradle-java-app
References
Gradle Offical Guide: https://gradle.org/
Gradle Tasks : https://docs.gradle.org/current/userguide/tutorial_using_tasks.html
Building Java Projects with Gradle: https://docs.gradle.org/current/userguide/building_java_projects.html
Congrats 😄
You know how to use Gradle now. This Article covered some of the basic Concepts of Gradle. Please go over the documentation of Gradle to know more about Gradle.
Happy Coding 😄