You can also check out my Youtube Channel to get access to various tutorials created by me.
What is a Thread
A Thread is a lightweight Process. Any Process can have multiple Threads running in it.
For example in a web browser, we can have one thread Which will load the User Interface and we can have one more thread which will actually retrive all the data that needs to be displayed in the User Interface.
What is MultiThreading
Multithreading enables us to run Multiple Threads Concurrently.
For example in a web browser, we can have on thread which handles the User Interface and in Parallel we can have one more thread which is fetching the data to be displayed.
So multithreading improves the responsiveness of a System.
What is Concurrency
Concurrency in the Context of Threads enables us to run multiple Threads at the same time.
But do the Threads Really run at the same time?
Single Core Systems
The Thread Scheduler provided by the JVM decides which Thread runs at any given time. The scheduler gives a small time slice to each Thread.
So at any given time we have only thread which is actually running in the processor. But because of the time slicing we get the feeling that multiple threads are running at the same time.
Multi Core Systems
Even in Multiple Core systems the thread scheduler is involved. But since we have multiple cores, we can actually have multiple threads running at the exact same time.
For example if we have a dual core system, then we can have 2 threads running at the exact same time. The first thread will run in the first core, and the second thread will run in the second core.
Why is Multithreading needed?
Multithreading enables us to improve the responsiveness of a System.
For example in a web browser, if everything ran in a single Thread, then system will be completely unresponsive whenever data is being fetched to display. If it takes 10 seconds to fetch the data, then in that 10 seconds we wont be able to do anything else in the web browser like opening new tabs, or even closing the web browser.
So running different parts of a program in different threads concurrently helps improve the responsiveness of a system.
How to write Multithreaded Programs in Java
We can create Threads in java using the following
- Extending the Thread Class
- Implementing the Runnable Interface
- Implementing the Callable Interface
- By using the Executor Framework along with Runnable and Callable Tasks
We will look at Callables and the Executor Framework in a separate Blog. In this article I will be mainly focussing on Extending the Thread class and Implementing the Runnable Interface.
Extending the Thread Class
In order to create a Piece of code which can be run in a Thread, we create a class and then extend the Thread class. The task being done by this piece of code needs to be put in the run() function. In the below code you can see that Worker is a class which extends Thread Class, and the task of printing numbers 0 to 5 is being done inside the run() function.
class Worker extends Thread {

	@Override
	public void run() {
		for (int i = 0; i <= 5; i++) {
			System.out.println(Thread.currentThread().getName() + ": " + i);
		}
	}

}
In the Above code Thread.currentThread().getName() is used to get the name of the Current Thread which is running the code.
In order to create a Thread, we just need to create an instance of the Worker class. And then we can start the Thread using the start() function.
public class ThreadClassDemo {
	public static void main(String[] args) {
		Thread t1 = new Worker();
		Thread t2 = new Worker();
		Thread t3 = new Worker();
		t1.start();
		t2.start();
		t3.start();

	}
}
In the Above code, we are creating 3 threads t1,t2 and t3 from the Worker class. Then we are starting the threads using the start() function.
Here is the Final Code for Creating a thread by Extending a Thread class
class Worker extends Thread {

	@Override
	public void run() {
		for (int i = 0; i <= 5; i++) {
			System.out.println(Thread.currentThread().getName() + ": " + i);
		}
	}

}

public class ThreadClassDemo {
	public static void main(String[] args) {
		Thread t1 = new Worker();
		Thread t2 = new Worker();
		Thread t3 = new Worker();
		t1.start();
		t2.start();
		t3.start();

	}
}
Here is the output we get by Running the above code
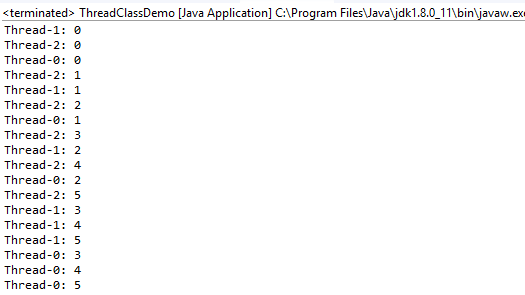
It can be seen that all the 3 threads have printed the numbers from 0 to 5.
It can be seen clearly from the output that the 3 threads do not run in any particular sequence
Implementing the Runnable Interface
In order to create a Piece of code which can be run in a Thread, we create a class and then implement the Runnable Interface. The task being done by this piece of code needs to be put in the run() function. In the below code you can see that RunnableWorker is a class which implements Runnable Interface, and the task of printing numbers 0 to 4 is being done inside the run() function.
class RunnableWorker implements Runnable{

	@Override
	public void run() {
		for (int i = 0; i <= 4; i++) {
			System.out.println(Thread.currentThread().getName() + ": " + i);
		}
	}

}
In order to create a Thread, first we need to create an Instance of RunnableWorker which implements the Runnable Interface.
Then we can create a new thread by creating an instance of Thread class and passing the Instance of RunnableWorker as the Argument. This is shown in the code below
public class RunnableInterfaceDemo {

	public static void main(String[] args) {
		Runnable r = new RunnableWorker();
		Thread t1 = new Thread(r);
		Thread t2 = new Thread(r);
		Thread t3 = new Thread(r);

		t1.start();
		t2.start();
		t3.start();

	}

}
The above code creates a Runnable Instance r. Then it create 3 threads t1, t2 and t3 and passes r as the argument to the 3 threads. Then the start() function is used to start all the 3 threads.
Here is the complete Code for creating a Thread by Implementing the Runnable Interface
class RunnableWorker implements Runnable{

	@Override
	public void run() {
		for (int i = 0; i <= 4; i++) {
			System.out.println(Thread.currentThread().getName() + ": " + i);
		}
	}

}

public class RunnableInterfaceDemo {

	public static void main(String[] args) {
		Runnable r = new RunnableWorker();
		Thread t1 = new Thread(r);
		Thread t2 = new Thread(r);
		Thread t3 = new Thread(r);

		t1.start();
		t2.start();
		t3.start();

	}

}
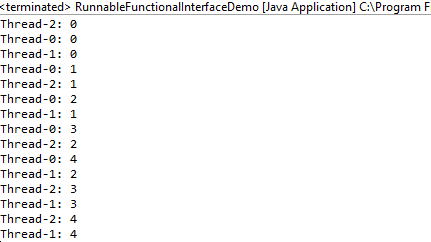
On Running the Above code, we will get the following output. The sequence of the output will change everytime the code is run.
Implementing the Runnable Interface is a better option than extending the Thread class since we can extend only one class, but we can implement multiple interfaces in java.
Runnable Interface in Java 8
In java 8, the Runnable Interface becomes a FunctionalInterface since it has only one function run().
The below code shows how we can create a Runnable Instance in java 8.
public class RunnableFunctionalInterfaceDemo {

	public static void main(String[] args) {

		Runnable r = () -> {
			for (int i = 0; i <= 4; i++) {
				System.out.println(Thread.currentThread().getName() + ": " + i);
			}
		};

		Thread t1 = new Thread(r);
		Thread t2 = new Thread(r);
		Thread t3 = new Thread(r);

		t1.start();
		t2.start();
		t3.start();
	}

}
Here instead of creating a class and then implementing Runnable Interface, we can directly use lambda expression to create a Runnable Instance as shown below
Runnable r = () -> {
        for (int i = 0; i <= 4; i++) {
            System.out.println(Thread.currentThread().getName() + ": " + i);
        }
    };
Code
The code in this article is available in the following github repo https://github.com/aditya-sridhar/basic-threads-demo
Congrats 😃
You now know how to create threads by extending the Thread class and by implementing the Runnable interface.
I will discuss about the Thread life cycle and challenges while using threads in my next blog post.